

Hello World Web3 App | Full Stack
Read smart contract w/ Truffle, Infura and Web3.js


After writing our first Hello World program with Solidity, we continue the Welcome to Web3 series.
Today we'll focus more on the way to make this smart contract human-readable by creating the front-end and connecting it to an Ethereum testnet using a Wallet and Web3 library.
We'll be following this plan:
- Deploy the Smart contract to a testnet
- Connect the smart contract to a front-end
- Deploy the front-end
Before starting, it's important to have an idea of how the apps work in the Web3 World. The layers of a decentralized app are a little more complex. But to simplify it, this is how we can modelize the architecture of a dApp:
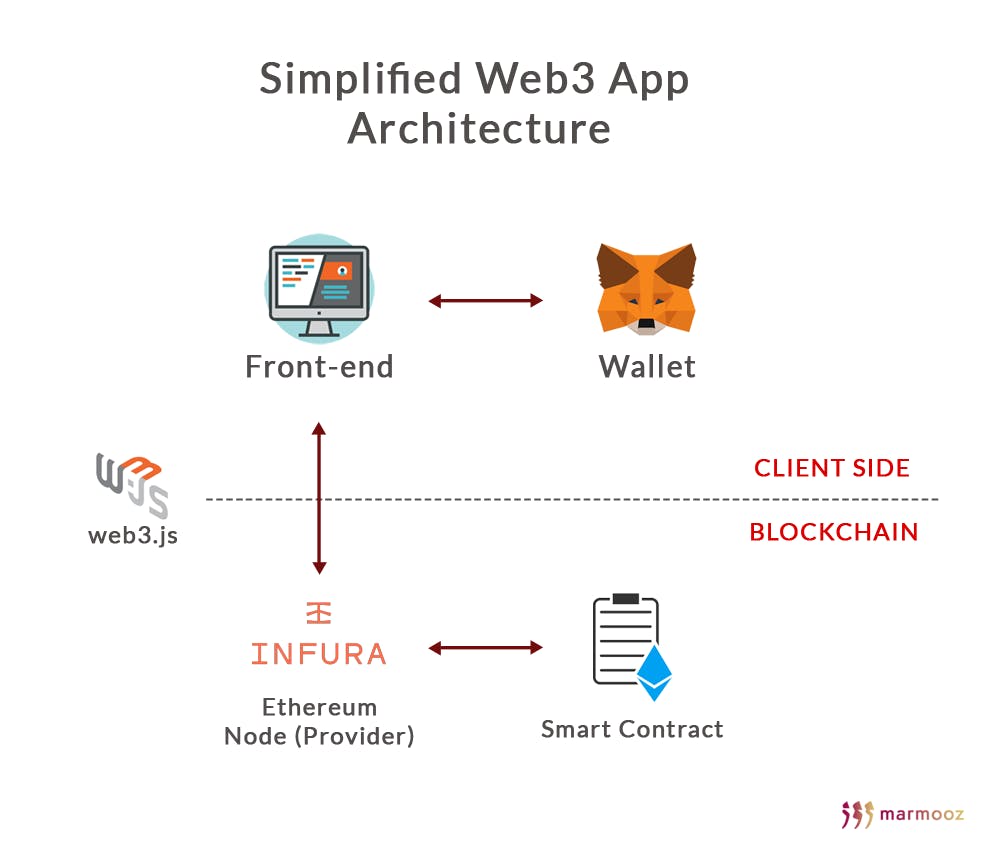
Let's go and make a full stack Web3 App!
Deploy on a testnet
In the last article, we used Remix to test and deploy locally our smart contract. We can also deploy it to a testnet with Remix. Instead, I'll introduce the most used tool for testing and deploying smart contracts: Truffle .
Truffle
Truffle is an amazing suite of tools that makes Ethereum development much easier. Hardhat is the main alternative to Truffle and is gaining more and more popularity.
Let's start with Truffle.
Begin with creating a new folder named HelloWorld.
Open your favorite IDE like VSCode or SublimeText.
Open a Terminal and install Truffle
npm install -g truffle
Then inside your HelloWorld directory create a new Truffle Project
truffle init
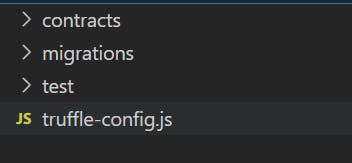
You'll see that Truffle has created sample files inside folders. Don't change or delete these folders. You must keep this architecture.
Inside Contracts directory, delete Migrations.sol and create the contract we wrote previously HelloWorld.sol
// SPDX-License-Identifier: MIT

pragma solidity ^0.8.9;


contract HelloWorld {
    function hello() pure public returns (string memory) {
        return 'Hello World!';
    }

}
The migrations files are very important. In Truffle world, to migrate means to deploy to the Ethereum network. So migrations files are what we write to deploy our contracts. Let's modify our 1_initial_migration.js file and explain it line by line.
const HelloWorld = artifacts.require("HelloWorld");

module.exports = function (deployer) {
  deployer.deploy(HelloWorld);
};
The artifacts.require method returns an abstraction of the contract inside the ./contracts/ folder. This is how we import our HelloWorld contract and store it in the HelloWorld variable.
The deployer object is how we queue the deployment (if we have many contracts and or deployments). The deploy method executes the migration.
Now go to the truffle-config.js file.
Let's define the version of the Solidity compiler. It must be the same as mentioned inside the contract with the keyword pragma.
compilers: {
    solc: {
       version: "0.8.9",
    }
  }
As explained in the first article of this series, you need a wallet to 'connect' to the blockchain and interact with the smart contract.
Truffle can do that through a wallet provider HDWalletProvider. This provider can handle the connection to the Ethereum network as well as the transaction signing.
In the terminal, Install Truffle's HDWallet-Provider.
npm install @truffle/hdwallet-provider
Then in the truffle-config file, import the wallet provider and define your network
 const HDWalletProvider = require('@truffle/hdwallet-provider');

module.exports = {
networks: {
 rinkeby: {
     provider: () => new HDWalletProvider(mnemonic, "https://rinkeby.infura.io/v3/YOUR-PROJECT-ID"),
     network_id: 4,       // Rinkeby's id

     },
As you can see, we use the module.exports syntax to specify the network rinkeby. For example, if you prefer Ropsten testnet the ID is 3.
The wallet provider needs two parameters:
Wallet connection
Ethereum node provider like Infura or Alchemy
To get a wallet connection with Truffle, you must have the mnemonic which is your secret phrase from MetaMask. If you forgot it, follow this guide here .
In order to get a node provider for free, let's use Infura.
Infura
The smart contracts don't interact directly with the front-end but use an Ethereum node. Instead of running your own Ethereum node, we call a provider which makes the development easier.
Infura’s API suite provides instant HTTPS and WebSocket access to the Ethereum mainnet and testnet networks. By using Infura, you can connect easily to Web 3.0.
Go to https://infura.io/ and sign up.
Click Create a new project on the top left.
Then choose Ethereum Product.
Next Change the network from Mainnet to Rinkeby and copy the https endpoint and paste it as a parameter of the provider in the truffle-config.js file.
Now your file must be like this.
const HDWalletProvider = require("@truffle/hdwallet-provider");

module.exports = {
  networks: {
    rinkeby: {
      provider: () =>
        new HDWalletProvider(
          "your secret phrase",
          "https://rinkeby.infura.io/v3/your-project-id"
        ),
      network_id: 4,
    },
  },

  compilers: {
    solc: {
      version: "0.8.9",
    },
  },
};
For security reasons, don't share this file in a public GitHub or on a server. Instead, Use a secret file .env to store the secret phrase of MetaMask. If someone knows your mnemonic, they have access to your wallet!
Now let's deploy our contract.
truffle deploy --network rinkeby
You can also replace deploy with migrate, it's an alias.
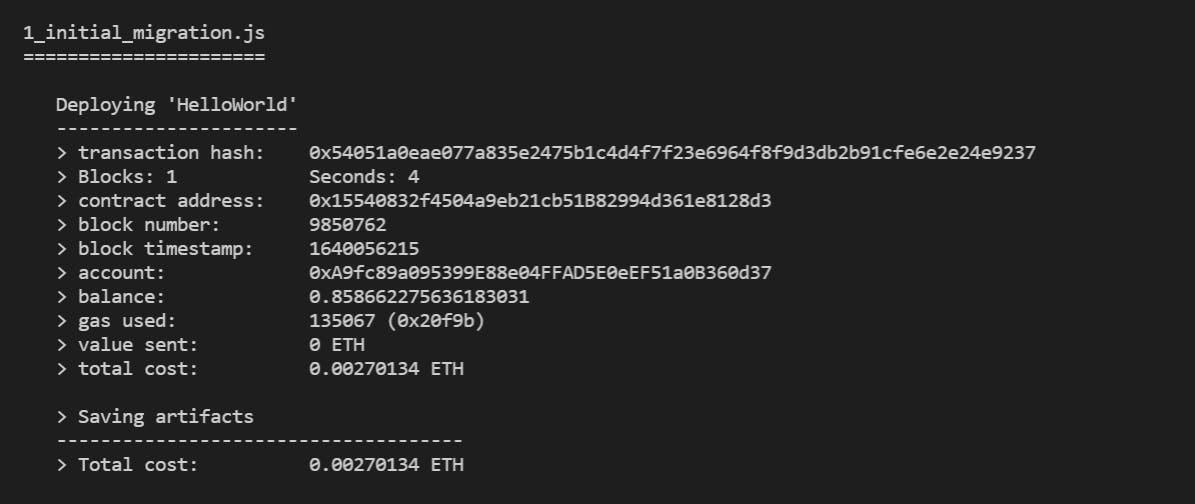
Congratulations you have successfully deployed your smart contract on a real public tesnet. You have all the informations about this transaction. Like gas fee, transaction hash (the ID of this transaction), the account (your wallet's address), and the contract address which is the ID of the deployed contract.
Remember that each time you deploy a contract you have a new contract address.
Connect the smart contract to a front-end
As presented in the first picture. We don't link the front-end with the smart contract directly. We point the ethereum node to the front-end using a library like Ether.js or Web3.js . We will use this latter.
To do so, these are the logical steps:
Create a web app
Check if we have a wallet and if so connect the web app to an account
Use Web3.js to point the deployed contract to the web app
To build our web app, let's use a simple CRA by React. Create a new directory outside the Truffle folder (to avoid build conflicts).
npx create-react-app FrontEnd
then install Web3 library
npm install web3
To interact between the smart contract you deployed to Rinkeby testnet and your web app, you'll need 2 important data: The contract address and the ABI of the contract.
The ABI, Application Binary Interface, is basically how you call functions in a contract and get data back. Put in other words, it's kind of like API.
The contract address and the ABI can be found in the Artifact of the contract.
The artifact holds all the pieces of information that are necessary to deploy and interact with the contract.
In Truffle, the artifact is the JSON file inside the build/contracts directory. Copy the content of this file and go to your React App folder to create a new HelloWorld.json file inside src directory. Paste everything and save.
Now let's go to App.js and paste the following code. The comments explain the code.
import "./App.css";
import { useState, useEffect } from "react";
import Web3 from "web3";
import ContractArtifact from "./HelloWorld.json";

function App() {
  const [message, setMessage] = useState("");
  const [myAccount, setAccount] = useState("");

  const checkWallet = async () => {
      //check if MetaMask is installed in the browser
    if (window.ethereum) {
      setMessage("Wallet Found");
    } else {
      setMessage("Please Install MetaMask");
    }
  };

  const readSmartContract = async () => {
    if (window.ethereum) {
      // if MetaMask found, request Connexion to the Wallet Accounts (log in)
      const account = await window.ethereum.request({
        method: "eth_requestAccounts",
      });

      // select the last used account, store it in state variable
      setAccount(account[0]);


      // Web3.js

      // select the ABI and contract address from Artifact file
      const contractABI = ContractArtifact.abi;
      const contractAddress = ContractArtifact.networks[4].address;


      // Create a Web3 instance (Metamask + Infura)
      const web3 = new Web3(Web3.givenProvider);

      // Get the deployed contract as an object
      const HelloContract = new web3.eth.Contract(contractABI, contractAddress);

      // Return(call) the hello function of the contract
      const theResponse = await HelloContract.methods.hello().call();

      // Store the result as State Variable
      setMessage(theResponse);


    } else {
      // If no Wallet
      alert("Get MetaMask to connect");
    }
  };

  // Run CheckWallet on Page Loading
  useEffect(() => {
    checkWallet();
  }, []);

  return (
    <div className="App">
      <p>
      {/* If the Wallet is connected to an Account returns the message. Else show connect button */ }
        {myAccount ? (
          message
        ) : (
          <button onClick={readSmartContract}> Connect </button>
        )}
      </p>

    </div>
  );
}

export default App;
That's it!
This is how you build your Web3 app.
If you run the React app, everything is working correctly.
Deploy the web3 app
To summarize, we have two main folders.
One with the Truffle and smart contract that you can call the Backend. This smart contract has been deployed to a decentralized network (Rinkeby Ethereum's testnet).
One with the React App which contains the front-end. We can also deploy it to a distributed network using IPFS for example. But we will deploy it to a centralized server.
This step is pretty common. You host it like any normal website or web app. If you like to do it for free I advise you to try Heroku or Netlify.
The result is here helloworldweb3.herokuapp.com
You can fork the source code on GitHub.
Follow me here and on Twitter for more Web3 articles.