

Write your first Hello World Web3 App
Code, Test and Deploy a Smart Contract with Solidity and Remix


Let’s continue our Welcome to Web3 series with our first blockchain application. After the necessary concepts of Wallets, transactions and testnet , let’s get into coding. Like any programming language, we start with a simple Hello World app.
Decentralized Apps
In the Web3 world, we talk about dApps (Decentralized apps). A Dapp is a software application that runs on a distributed network (Ethereum Blockchain for example). It can be a website or a mobile app on your phone. The main difference is that it’s not hosted on a centralized server (like AWS S3), but instead on a peer-to-peer decentralized network, hence the name.
Smart Contract
A smart contract is a program that runs on the Ethereum Blockchain. This is how we can communicate with the Blockchain and make transactions. Smart contracts demonstrate the core logic of a decentralized app. It is the distributed part of your dApp. Solidity is the programming language that was designed to allow developers to create smart contracts.
To make it simple, a dApp = Front-end app + Back-end connected to a Smart Contract.
The Process
In order to build a dApp, these are the steps to follow:
Write Smart Contract
Test the Smart Contract
Deploy the Smart Contract on a Local Blockchain
Deploy Smart Contract to a real Testnet
Build a Web3 App (front-end) and Connect it to the deployed Smart Contract
Deploy the Web3 App
This tutorial is divided into two parts. We will cover the 3 first steps in this article.
1- Write Smart Contract
First, we'll use Remix. It's an IDE built to help us in Ethereum development and using smart contracts. Of course, we can use VSCode or any other IDE, but Remix has many features and plugins that will make your life easier especially if you are new to Solidity and Ethereum Dev.
Go to https://remix.ethereum.org/
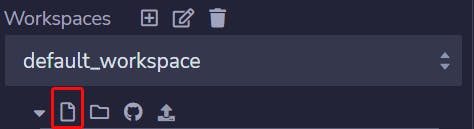
Create a Solidity file HelloWorld.sol inside the contracts folder and delete all the other contract files
Inside HelloWorld.sol write this:
//SPDX-License-Identifier: MIT

pragma solidity ^0.8.9;
Let's explain these lines of code.
First, we define the License of your software. You can use MIT or GPL-3.0. These two licenses are permissive and allow commercial use of the code.
Pragma is an instruction that defines the compiler version of Solidity file. It will generally be the first line of any Solidity file. The ^ means or above. So this line tells that we'll be using at least the version 0.8.9 of the Solidity Compiler.
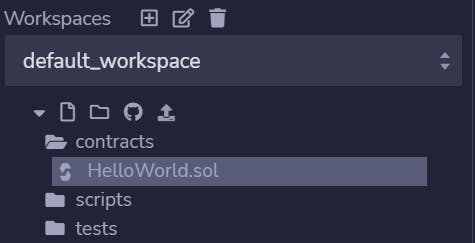
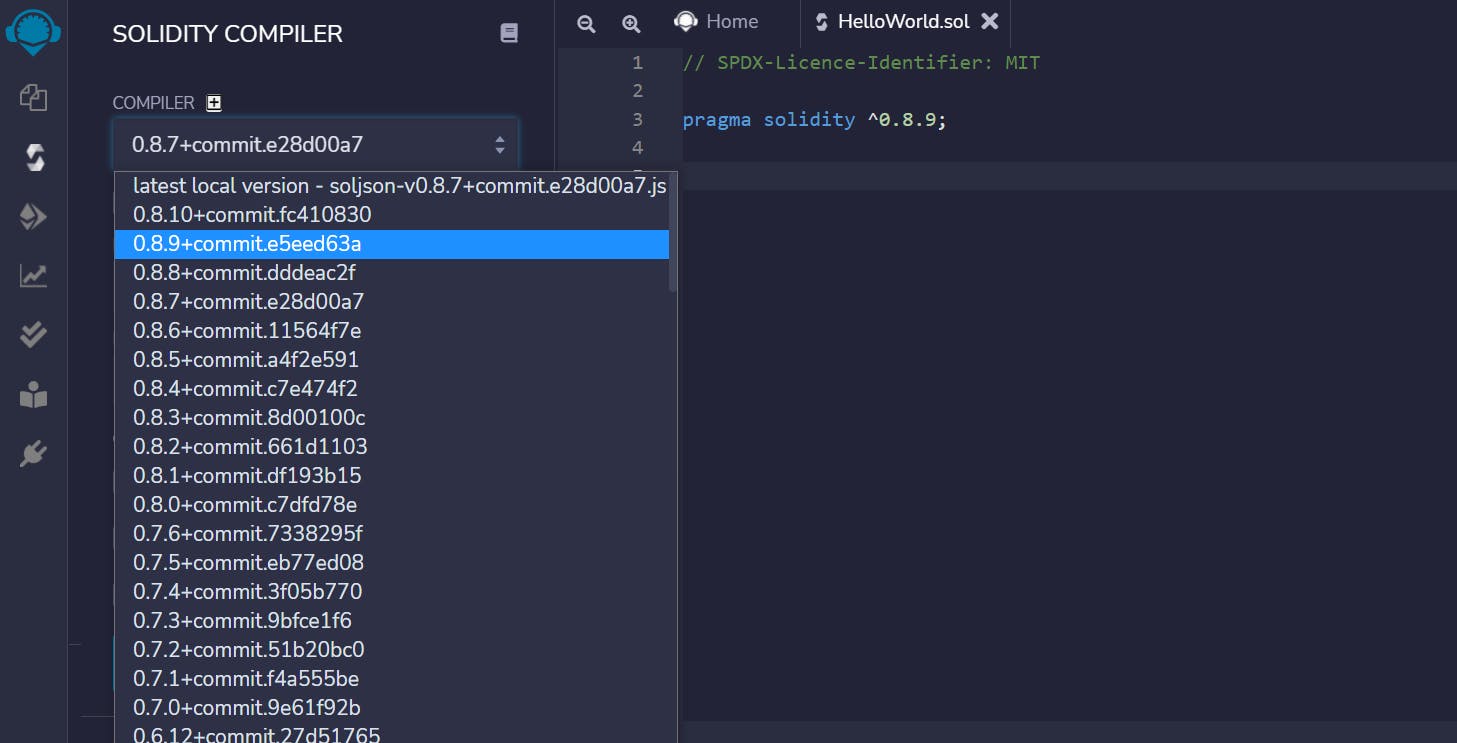
You can choose any version of the compiler as long as it is the same as the one used in your Remix IDE. This is why you should click the Solidity icon on the left and select the compiler version
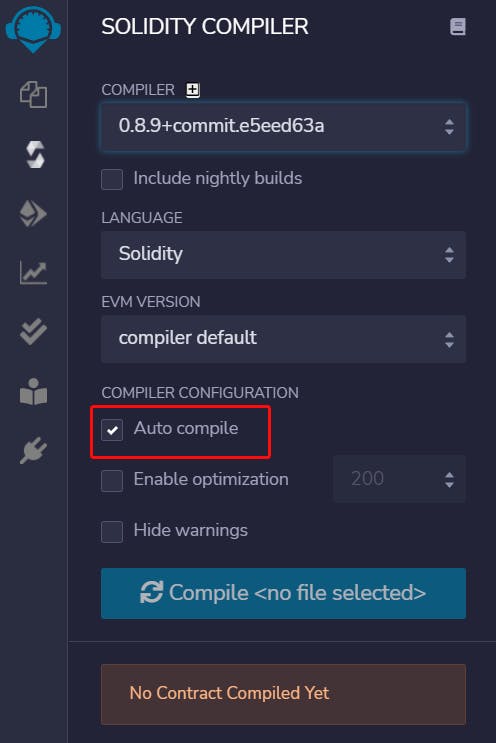
Then to avoid recompiling each time we make a change on the code, check to Auto-Compile Button.
Now let's get back to the File explorer and let's write our first contract.
//SPDX-License-Identifier: MIT

pragma solidity ^0.8.9;

contract HelloWorld {

}
This is how we define a contract named HelloWorld. A contract is a collection of code (its functions) and data (its state). Once deployed, a contract resides at a specific address on the Ethereum blockchain.
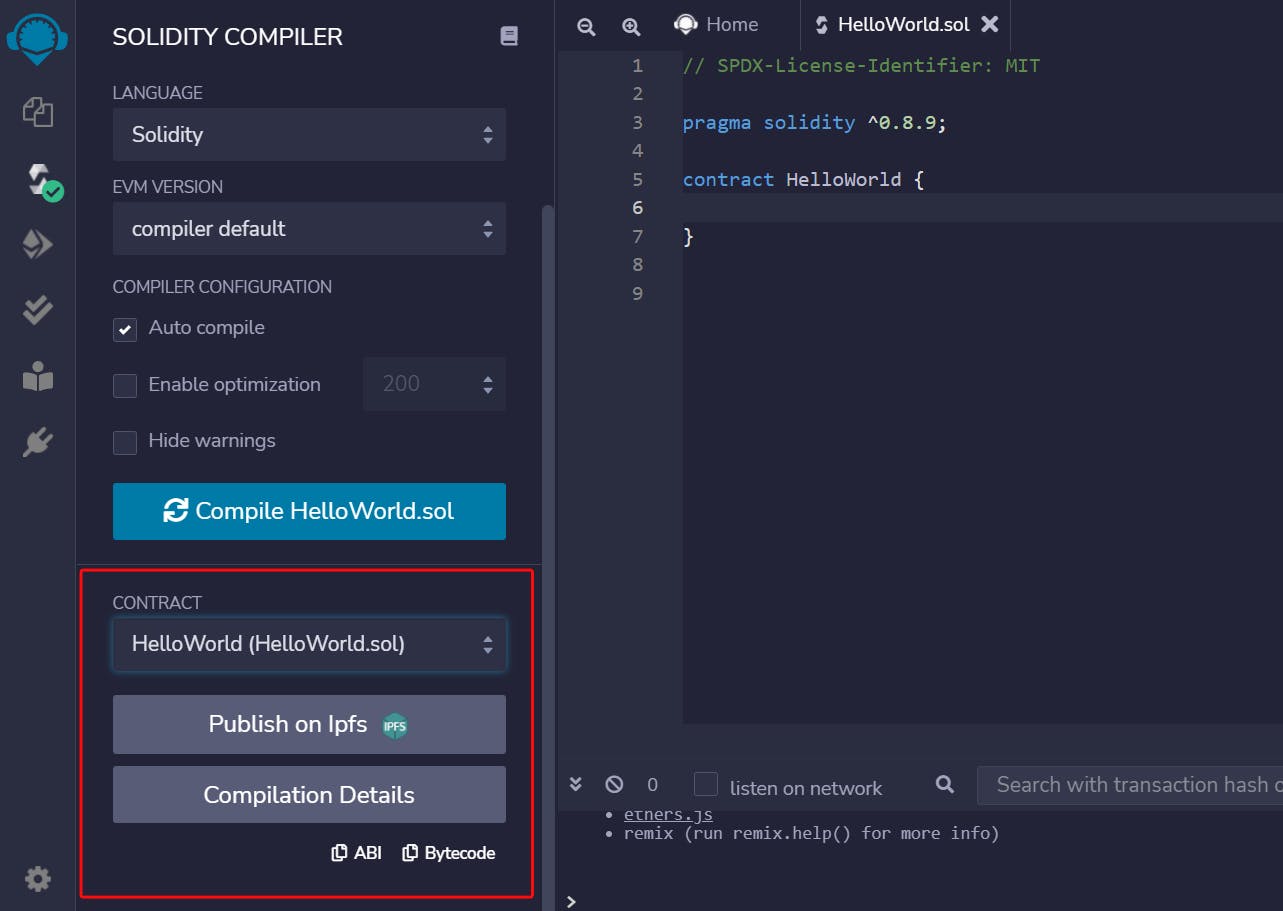
One of the advantages of Remix is that we can see that a contract has been coded and many options can be easily used later.
Now let's add a function hello to this contract. If you know the basics of functions in Solidity you can skip the little steps and following explanations. If not, let's pretend functions are just like in JavaScript to see what happens.
//SPDX-License-Identifier: MIT

pragma solidity ^0.8.9;

contract HelloWorld {
      function hello() {
           return 'Hello World';
      }
}
Congratulations, we just got our first 2 errors!
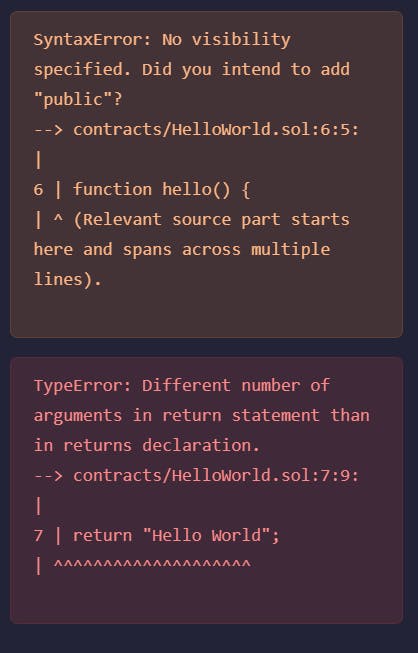
The first error is about visibility. This defines the scope of your function. Just like your Class methods in JavaScript. It can be public or private.
In our case let's add public just after the function hello() and before opening the brackets.
It works. We only have the second error to deal with.
This error is about the returned value of the function. In Solidity, we must specify what will be the type of our function result. In this case, we want a string type of data. so we use the **returns **keyword with an s, followed with the type of data (string or uint or array[])
So let's modify our function
function hello() public returns(string) {
    return 'Hello World'
}
We have a new error
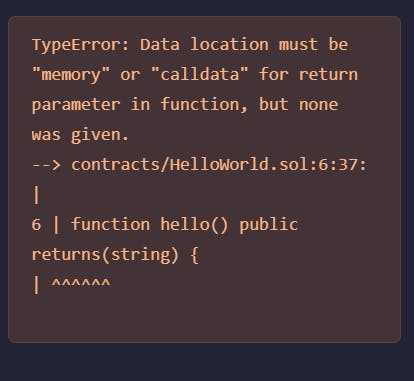
This one is about Data Location.
When writing a smart contract, each declared and used variable has a data location. We must specify where this variable should be stored. In blockchain development, this is important because every modification of a variable is a transaction. And any transaction costs gas (fee).
The amount of gas during a transaction depends on the data location specified in the contract. The goal is to optimize our code and use the least gas.
Data location we'll use is memory. In this case, we store the variable temporarily and it's cheaper than the **storage **location which stores the variable on the blockchain.
// SPDX-License-Identifier: MIT

pragma solidity ^0.8.9;

contract HelloWorld {
    function hello() pure public returns(string memory) {
        return "Hello World";
    }
}
No errors and plus we got this

This means you just wrote your first Hello World contract and all is correct. Congratulations 👏
Test the Smart Contract
One of the main important aspects of Smart contracts is testing.
Unit testing - in every language and field - is an effective way to validate your code and spend less time debugging. But when it comes to blockchain development, it is a necessity.
Remember that smart contracts are immutable. Due to the immutability nature of blockchain, no change is possible on a deployed smart contract or a verified transaction.
Thus, before deploying a smart contract on the blockchain and spending an amount of gas, we must be sure that the code is properly tested.
We test it in 2 ways:
Unit testing of the smart contract
Deployment of the smart contract on a Testnet before the real blockchain network.
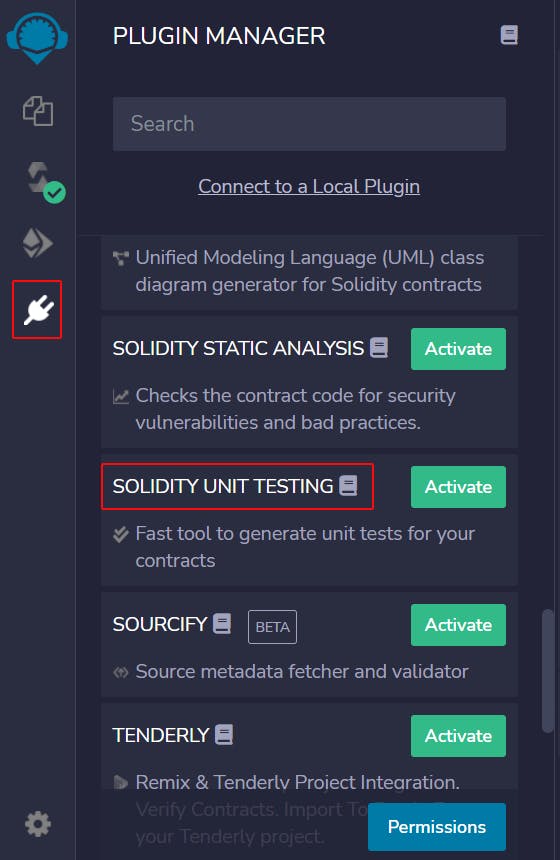
There are many tools to perform unit testing. We will use the Solidity Unit Testing plugin of our Remix IDE.
If it's not already visible on the left panel, go to the plugin manager and search Solidity Unit Testing to activate it.
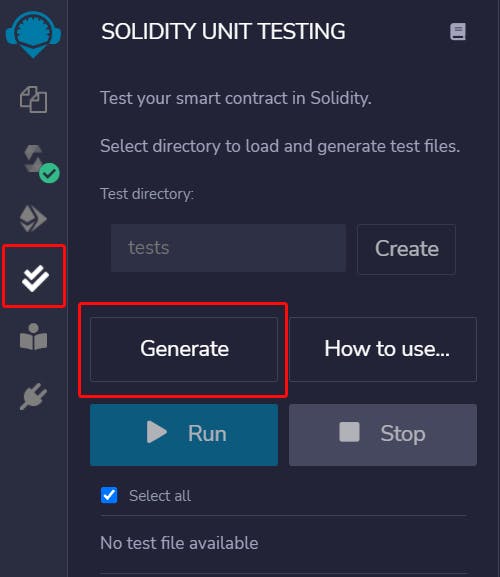
Go to the new testing panel and click generate to get a sample file of unit testing for the smart contract. Delete everything and replace it with the following code
// SPDX-License-Identifier: MIT

pragma solidity ^0.8.9;
import "remix_tests.sol"; // this import is automatically injected by Remix.
import "../contracts/HelloWorld.sol";  // Import the smart contract.

contract HelloWorldTest {
    HelloWorld instanceContract; // Define an instance of the contract

//beforeEach is run before every compilation
function beforeEach() public {
    instanceContract = new HelloWorld(); // Create an instance of the smart contract
  }

//Checking the value of the hello() function is equal to an expected message
  function checkSucess() public returns (bool) {
    return Assert.equal(instanceContract.hello(), "hello world", "Wrong message");
  }

}
Now back to the unit testing panel. Click Run
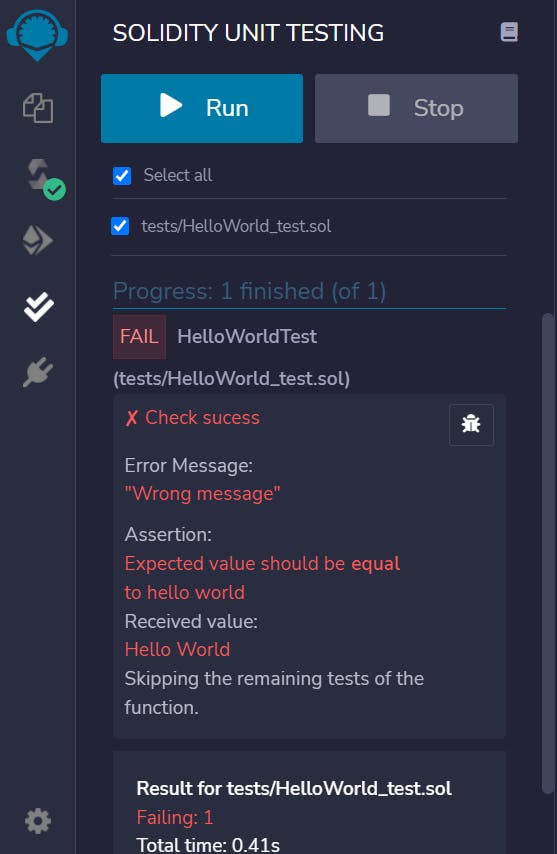
We got an error. This is because our expected message is all in lowercase 'hello world'. Replace it with the message we want: 'Hello World'. And run the test again.
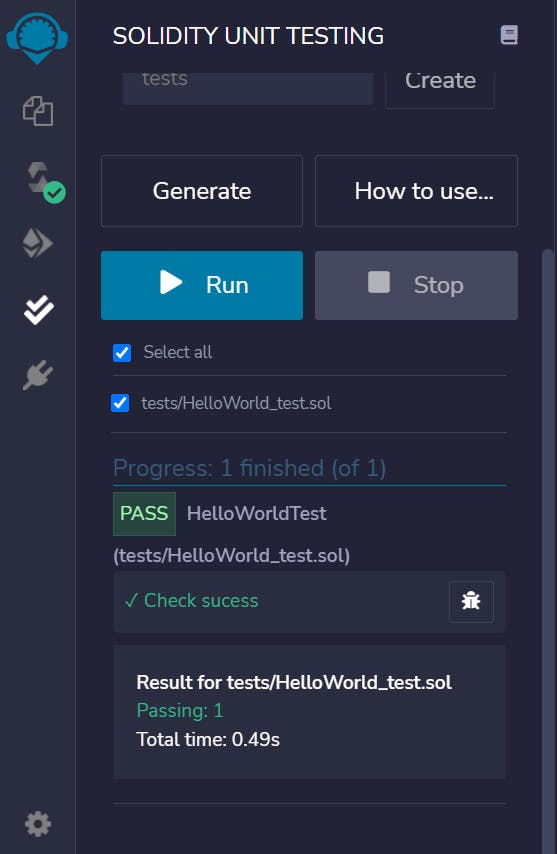
Excellent! Now our smart contract is well tested.
Deploy Locally
During development, it is always better to use a local blockchain. It runs on your machine, requires no Internet access, provides you with all the Ether that you need for gas, and mines blocks instantly.
Just like for testing, we could use tools like Truffle or HardHart to deploy locally. But we will use Remix IDE instead. It has everything we need for now.
Go to the Deploy & Run module. Choose JavaScript Virtual Machine as an Environment. You can notice that you have now an account: a Wallet address with some Ether money. Don't worry it's free, and it's for testing purposes.
Be sure to select the correct Smart Contract (HelloWorld.sol) not the unit testing Smart contract.
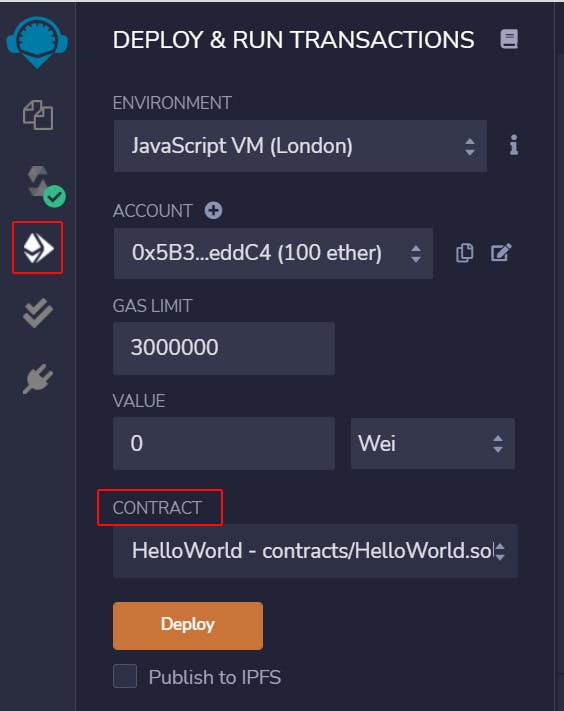
Then click deploy. Keep an eye on the terminal. Unfold the details. This is what we have.
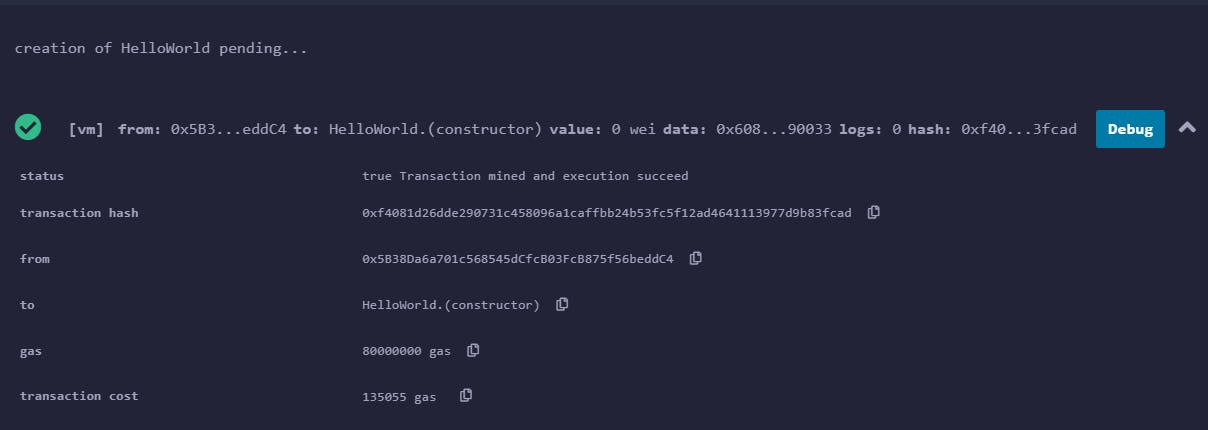
Status true means that the deployment is successful. We also know how this transaction costs in gas and many other pieces of information.
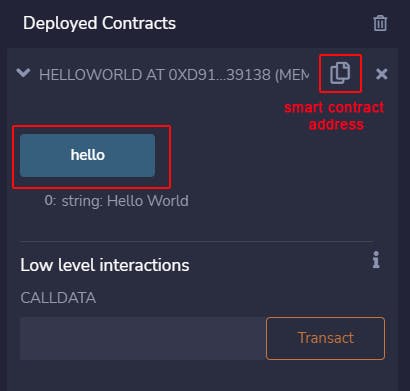
On the Deploy module, unfold the Deployed Contracts.
You see your smart contract with a code AT 0x... This is very important it's called the smart contract address, it's the ID of your smart contract. Every time you deploy an instance of the smart contract you get a new and unique address of your deployed smart contract.
You also have a button corresponding to your hello function. It's a visual way to check how a local blockchain network sees your smart contract. Click on the hello button. You'll get the result string: Hello World.
All Good ✅
This is how we deploy on a local blockchain with Remix.
If you made it to this part, congratulations you've just succeeded in writing, testing, and deploying your first Hello World Smart Contract using Solidity Language. 🎉
Thanks for reading 🙏
Feel free to comment if you have any suggestions or question
The next part will be even better.
It's how to make the front-end of this decentralized App and how to deploy it on a real Ethereum testnet. This is how you can start your full-stack Web3 development path.